This is part 3 of my free skin retouching workflow series of articles. In this part we will be talking about how I go about working with RAW files, what do I do to prepare them for later stages of retouching, what is my thinking process while I work with RAW files, how do I export them into Photoshop, which software do I use (and which I don’t) and why. It is packed with information, so make yourself a cup of tea, sit down comfortably in your favourite chair and let’s begin. It’s RAW conversion time.
Part 1 and 2
I want to quickly mention about part 1 and 2 before we begin. In the first two parts of this series we talk about working with skin inside of Photoshop, how I do my skin cleaning stage and use dodge and burn to improve the skin. I talk more about the workflow itself, why and how I work and what tools do I use. If you want to know more about my workflow, before learning how I work with RAW files, then please read the first 2 parts before continuing with this one. You can find them by clicking on the links here: part 1 and part 2.
RAW
This article is about working with RAW files, should really be the first part of the skin retouching workflow articles. The reason is that this is the first step in, pretty much, every photo retouching project I do. The only exception is when I get TIFF files instead of RAW’s. Some photographers like to do their own custom RAW conversion and send TIFF instead. That’s fine by me, less work for me.
RAW or raw
There is a discussion going about should you refer to these files as RAW or raw. I don’t really want to go deep into the discussion here, but please be aware, Dear Reader, that RAW is not an acronym and it stands for nothing. The files are raw, as in not cooked yet. I am referring to them as RAW in this article, simply because that is how most people refer to them and I don’t want to bring any more confusion to the subject.
Should I shoot RAW or JPG?
There were many articles written about the subject and I don’t want to go deep into this subject as well. I will link to a couple of articles that you can read more about it. All I can say is that during my photography years, I have always been shooting RAW and never, even once, regretted it.
You can read more about the subject in this article on Expert Photography website and also this one on Peta Pixel website.
ACR or C1
When I get RAW however, the first thing I do is to open it with my RAW conversion software. And here, Dear Reader, you will get the first shock. I use Adobe Camera Raw. Yes, you’ve read that right. I don’t use Capture 1 as my go-to RAW conversion software. I’m not sure if I should be explaining my reasons here, but just in case I will mention a couple of points.
I did not buy into the hype of Capture 1 a year or so back. People went mad for it and decided it is the best thing since sliced bread. I had a go at it and I couldn’t really see what the hype is about. From what I can gather about C1, reading other people comments, apparently, it makes the colours to pop more and adds more contrast to the image right out of the bat. This is not something I am interested in as a pro retoucher to be honest. You are probably wondering why. I will explain that in more detail when I will be talking about my main goal during raw conversion stage.
Second reason is purely material. I already have ACR bundled with my Adobe software bundle, while I would have to pay a separate subscription for C1 software. In future I plan to buy C1 at some point, but at the moment, I have not yet felt the need. I don’t really think it matters when ACR does everything I need (and more).
Capture 1 is great, but…
Please don’t get me wrong. I think Capture 1 is a great software and I’m pretty sure many who bought it are very happy with it, as costumer reviews seem to indicate. For me though, C1 doesn’t offer enough over ACR to justify its price. There seem to be not enough benefits for me to be thinking about integrating C1 into my workflow. As a pro retoucher I want to be in total control of my RAW conversion, so I don’t mind if my RAW files look a bit “flat”. I also find ACR easy to use and intuitive, but that is a very subjective thing. Both options are valid and the software you use shouldn’t matter. The only thing which should matter, is the end result.
OK, let’s talk about the main goal.
The goal
My main goal during RAW conversion stage is to prepare the photo for retouching. What I mean by that is, I want to create a good base, a foundation, to work on in Photoshop. By good foundation, I mean, a good neutral looking image. I will explain it in more detail bellow.
What I am doing here, at this stage, is I’m making sure all the colours and values are what they should be. If the image has a weird colour cast, or a tint, or white balance is not right, this is where I will be fixing it. I will talk more about that process bellow.
Similarly, if the image was over or under-exposed, this is where I fix it too.
At the end of RAW conversion stage, I want to have image that is well balanced, ready for retouching in Photoshop. That means, well exposed, with correct white balance, with all the colours as natural looking as possible.
I do all of my creative colouring or creative exposure modifications inside of Photoshop at later stages of retouching, not during RAW conversion stage.
This is the reason, why a “better” colour rendering in C1 (this is a subjective thing by the way), is not a reason for me to buy C1. I simply don’t need more contrast colours at this stage. All I’m caring about here, is for the image to be as natural looking as possible.
Even though the rest of the RAW conversion will be explained around ACR, the principles still apply to C1 or any other RAW conversion software of your choice.
OK, so now that we have this out of the way, let’s begin.
First things first
First thing I do, is open the RAW file in ACR. I use Adobe Bridge to navigate around my files, so I double click on the RAW image I want to work and open it inside ACR. I never open more than one image at the same time in ACR.
Evaluation
I typically start by evaluating image. How good or bad is the white balance, contrast, exposure and brightness, are highlights blown out, are shadows too dark, etc. I don’t worry about skin or small detail here at all. RAW conversion is all about the overall look. I don’t remove anything or do any changes to small detail inside of ACR. I work on global changes, not local at this stage.
Lens correction
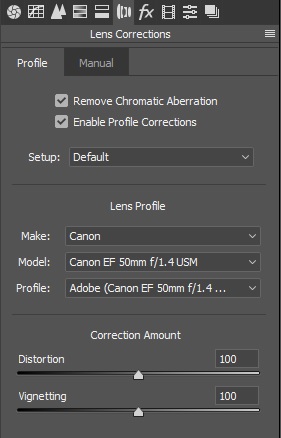
Usually I start by enabling Lens Correction profiles. I use the Correction Amount sliders to dial in the look that I want. Sometimes the natural lens vignette is not a bad thing and the distortion correction actually makes the face look weird. Sometimes client doesn’t want any changes to the structure of the face, so I leave it as it is. And only use the corrections if I think they improve the overall look of the image.
Camera profile selection
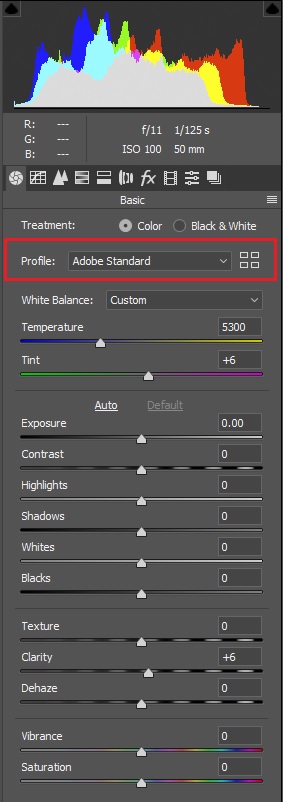
Then comes the camera profile selection. I do this at the beginning because it changes the way colours are rendered and therefore makes the other settings not valid if I make changes to it at later stage of my conversion. If I was to change values in some sliders and only then pick a colour profile, the look will change and the setting I have dialled in would be irrelevant. So I pick a profile first.
I pick the profile based on what I want to achieve and the overall look of the image. Some images I want to look very neutral, flat even, I would then pick a “Neutral” profile. Some image I like the look of “Faithful” or “Standard” profile. Other times I pick the default “Adobe Colour” profile. It all depends on the look I want to achieve.
White balance
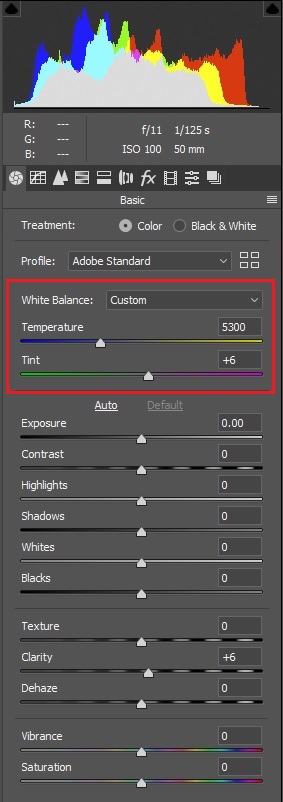
After that I usually start with white balance settings. Ideally, I want the image to be looking as natural as possible, that is, the same way as we would have seen the subject during the actual shoot. It’s not always easy to dial it exactly the way it should be. I often start with the white balance profiles that are already predefined, like Auto, Daylight or Flash, but more often than not, I actually end up picking white balance manually based on what I see.
White balance manual selection
I start WB manual selection process often with the White Balance Eye Dropper Tool and try to find neutral grey area within the frame. If photographer shoot the image on white or grey background, I can usually get it pretty close to the look I want with just a click of the tool. Often though, there are no greys in the frame or the WB Eye Dropper Tool has not a great work. Then I have to dial the white balance in by eye.
Working with colour is often a challenge and picking white balance, which is a bit like a foundation for all the other colours, is not different. I sometimes do it in a couple of stages. I get it as close to real colours as I can in the first stage. Then I look away for few minutes (or take a break) and come back to white balance settings once more. The reason is that when staring at colours for too long, we often think they are right. Our brain and eyes average the colours out and we think they look natural / neutral. When in truth they are not.
Working with colour? Take a break
After a few minutes break, I come back to the image and often find that the white balance I dialled in before is not as good as it can be and a fine tune is needed. I do it again then.
The trick I often use here, is to move the sliders left and right to the point where colours look bad and then try to settle on a look which sits somewhere in the middle between the two bad points. I do the same with green / magenta tint slider. Again, the goal here is to make my whites white, greys grey and blacks black. I’m not interested in any creative colour manipulation here.
Exposure, contrast, brightness, highlights, shadows
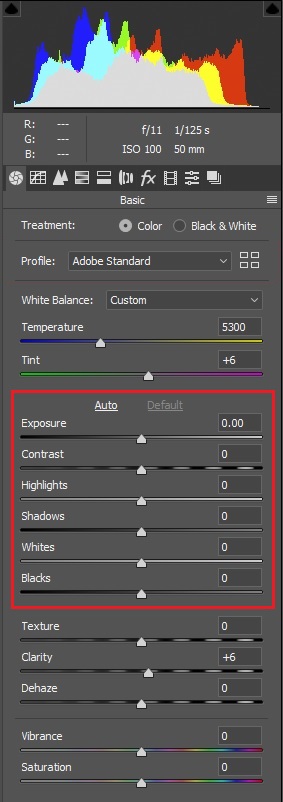
After I have WB dialled in, I often start working on exposure / contrast / brightness / highlights / shadows values. The goal is to make the values look natural. This is not the point where I make any creative exposure modifications. I want the highlight to be bright, but not blown. Shadows to be dark, but not crashed. Mid tones well defined and neutral.
The rest of sliders
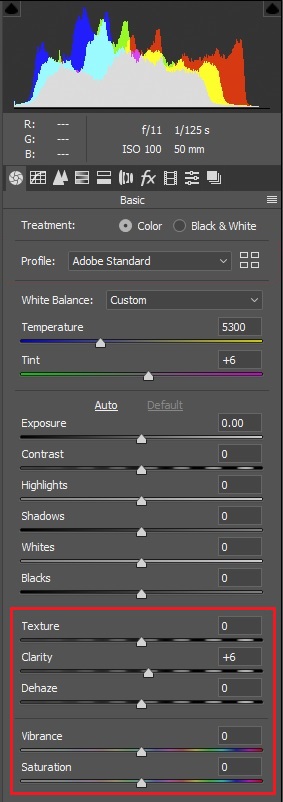
When working with skin, I rarely touch texture, clarity, dehaze, vibrance or saturation sliders. Sometimes I go to HSL Adjustement tab and make a specific colour adjustment there. For example, sometimes I will remove all blues from the image (if nothing important is blue), sometimes greens and so one. Basically I might remove all not important, distracting colours. It all depends on the image and the look I want to achieve. Once again, I’m not worried about creative colours, I want all the colours to look natural and to remove any unwanted colour casts / tints from the image.
On some images, ones that are exposed well and don’t have any major problems, I don’t really do that much at RAW conversion stage at all. I just switch Lens profile on, modify white balance and export to Photoshop.
For me, Photoshop is where 90% of work is happening. RAW conversion is only to create a good base for all of my future retouching.
Time to export

When it comes to exporting to Photoshop. I usually embed the RAW inside (export as smart object). It is a habit I should probably re-evaluate at some point, because it makes the files larger and after I start my cleaning stage (as per part 1 and 2 of this retouching workflow), I then cannot go back to ACR and make changes to the RAW file anyway. It would make all the cleaning layers go bad and I would either have to spend a lot of time trying to match the look of the cleaning layers to the new look of the base image, or start from scratch again.
So once I have the RAW image look dialled in, it is usually locked in place and I don’t go back to it.
Colour space
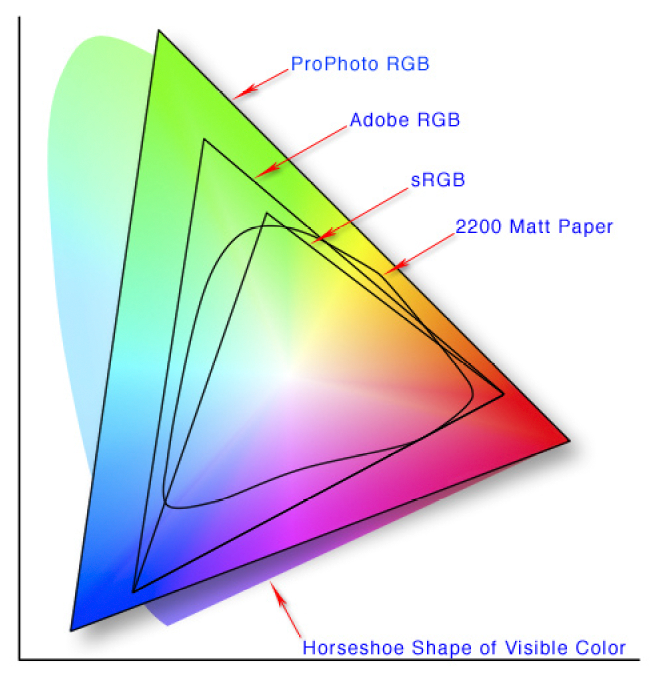
I won’t go into too much of detail here about different colour spaces and which should you use. I will mention that when I work on client photos I always work in AdobeRGB and 16bits/channel (unless client sends my a TIFF with different settings). AdobeRGB is a good compromise. It is still a very big colour space containing many more colours than web-standard sRGB. When I work on my own RAW files, from time when I was photographing myself, I work in ProPhotoRGB colour space.
I pick 16 bits per channel settings to have more flexibility when it comes to colour work and to avoid banding when pushing colours hard.
Sharpening
A quick mention about sharpening. I don’t do any sharpening at this stage. In fact I don’t usually do any sharpening whatsoever during retouching. I might sharpen the output JPG file after I resize it, but I don’t add any sharpening at any stage of my retouching.
Tips and tricks
Sometimes I use another trick involving RAW files inside Photoshop. Once I export it to Photoshop as a smart object, I then copy the base layer as another smart object in the layer palette (so that they are not linked), I make changes to the top one, mask it and paint the mask to reveal changes where I want.
Here is a recent example of the above. I have recently worked on a file where I wanted to make the background white. I have pushed the white slider and highlight slider as much as I could in ACR. I did not want the skin highlights to be blown out, so I couldn’t move the slider all the way to the right and make the background white inside ACR. So what I’ve done instead is I exported it into Photoshop, copied the base layer as another smart object, double clicked on the new one. And inside ACR I have pushed the whites even further, to the point where even the skin highlights were blown out. I then accepted the changes, went back to Photoshop. Added black mask to the new smart object layer and carefully painted the white background in around my subject using white brush on black mask.
This way I had completely white background, the skin was still looking as it should and I could start with my skin retouching. All in, it took 2-3 minutes to have ideally white background.
Photo example
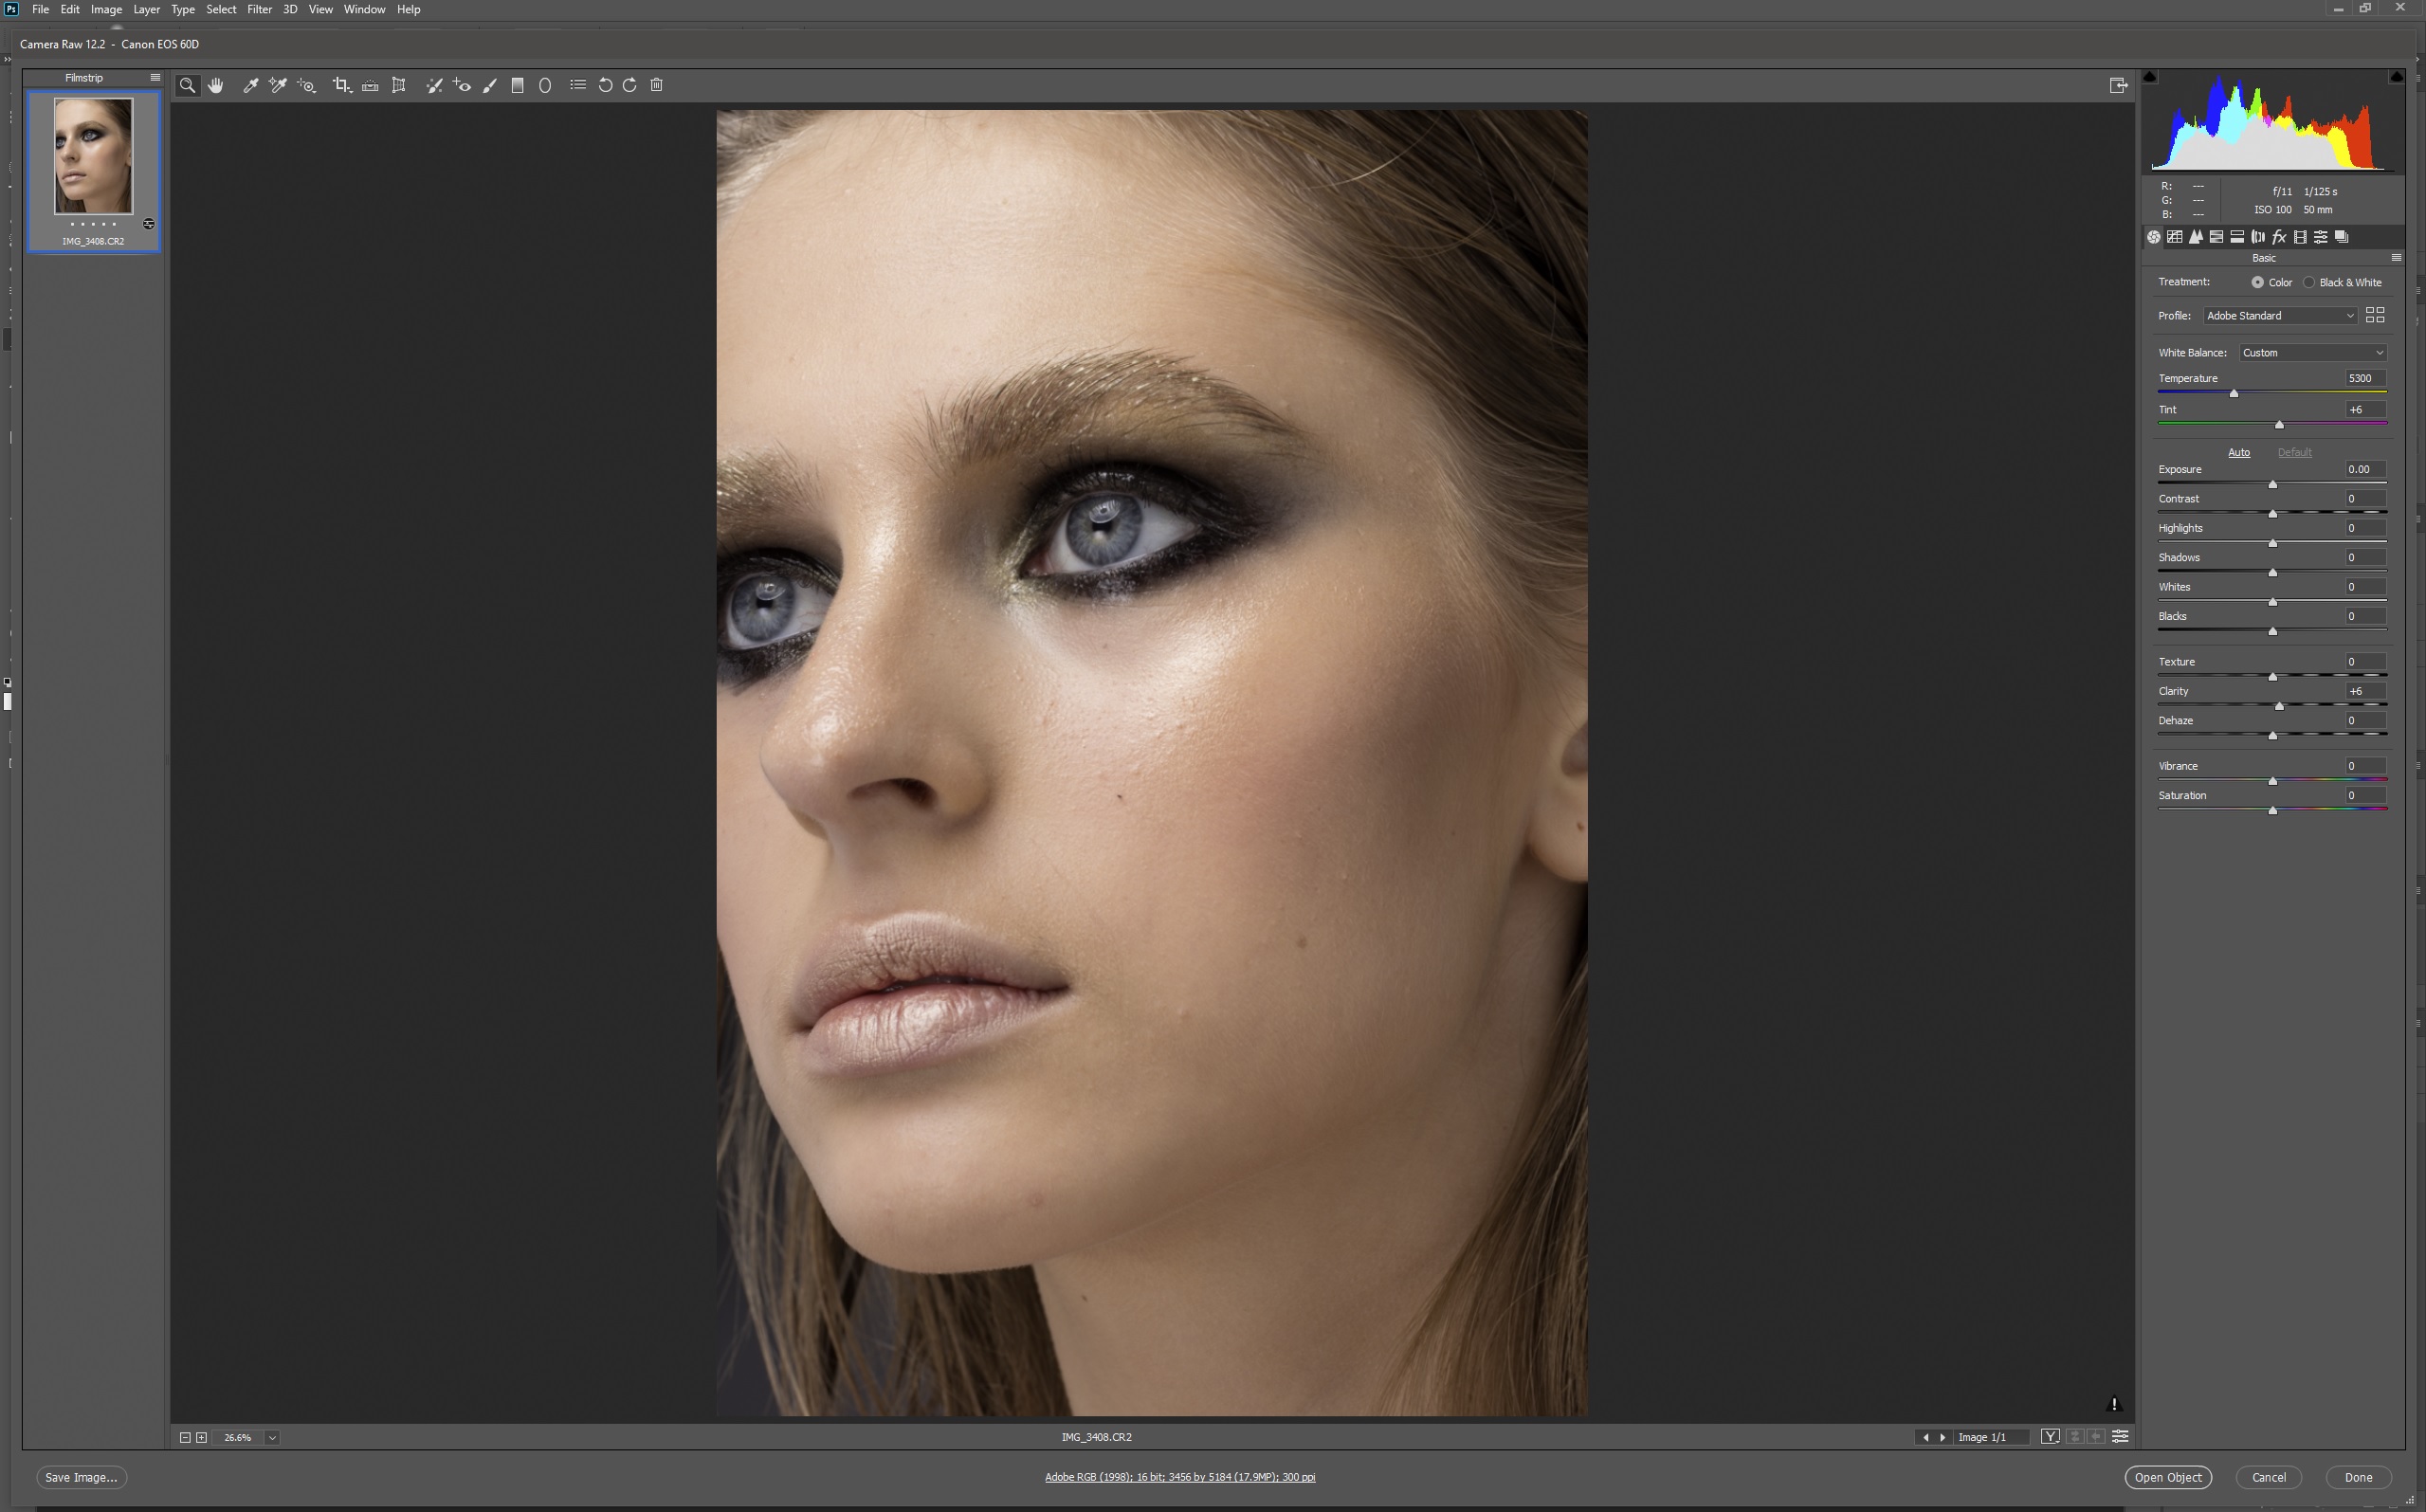
Let’s go back to our image from part 2 of our skin retouching workflow. Here is the complete llist of changes I have done to it in ACR.
I started off with enabling lens corrections and allowing ACR to decide on the amount automatically. I did not modify it manually this time. I then changed the colour profile to Adobe Standard. I liked how it rendered the colours and gave me enough contrast inside of the image. I liked the contrast and exposure values, so I did not modify them at all. I have added a tiny bit of clarity to boost the skin texture a bit (this edit was done 2 years ago, before the texture slider was available inside of ACR). This is not something I do very often, but I felt like I wanted a tiny bit more skin texture present. And that’s it. I have not done any other changes to the image at this stage. I have exported it to Photoshop and started working on the cleaning stage and DB stage (both described in part 1 and 2 of my skin retouching workflow).
As you can see, I have not done that much during RAW conversion stage with this image and most of the work was actually done inside of Photoshop.
It’s a wrap
This is the end of part 3 free guide to my skin retouching workflow. We have talked about working with RAW files, what are my goals, what tools and software do I use and why. We have went over my thinking process during this stage, what is and isn’t important to me. I hope this series is helpful to you in your quest to mastering skin retouching. I plan to release more parts of the skin retouching workflow articles in future, so if you are interested in them, please visit us back in future and say hi.
Thank you, Dear Reader, for continuing on and reading my little articles. Please bear in mind, that I learn how to write these guides as I go, so please excuse imperfections, raw and chaotic style. I do enjoy writing them however and I hope they bring some value to you, Dear Reader. If you feel like giving me a feedback of any kind, then please feel free to do so. I want to improve my writing skills, so all feedback in invaluable to me. It also lets me know that there is someone out there who actually read it.
Thank you for getting this far.
Please also read part 1 and part 2 of our free skin retouching workflow. You can find the rest of the parts here:
Part 1 – My Skin Retouching Workflow Explained
Part 2 – My Skin Retouching Workflow Explained some more
Part 3 – My Skin Retouching Workflow – Working With RAW
Part 4 – My Skin Retouching Workflow – Luminosity and Exposure
Part 5 – My Skin Retouching Workflow – Curves Tool – Why is it important?
Part 6 – My Skin Retouch Workflow – Introduction to colour
Part 7 – My Skin Retouching Workflow – How to fix fingernails in Photoshop
Part 8 – My Skin Retouching Workflow – Simplify the image – remove
If you would like to buy me a coffee, please use the link bellow. Thank you!
About the author

Adrian Alexander is a senior retoucher and founder of Ad Retouch Studio, photo retouching and post production studio based in UK. His first contact with Photoshop was in the 90s, but he found his true love of editing photographs during his photography years, which started when he purchased his first dSLR camera in 2009. These days he is concentrated on his retouching business, finds pleasure in teaching, but his true love is still improving photos in Photoshop.