Simplify images – remove distractions
In this post we will be talking about the ‘why’ of removing distractions from images. I would like to explain my thinking process behind deciding if I should keep or remove certain elements from images I work on. We will talk about what to remove and when, what I consider a distraction, how should you decide whether to keep something or remove, how should you check for distractions and when something is an unwanted distraction to the image. We will also talk about why is it important to remove unwanted distractions from images.
Decision of what to remove is quite subjective, meaning that what I consider a ‘distraction’ might be a feature for you. Something that I removed from the image, might be that something that you would keep. That is totally fine. Art is subjective and something that has no meaning to me, might have a big meaning to you. That’s why when working with clients, if I’m not sure, I always ask if that is something I should remove.
Distractions
There are however semi-universal rules. For example, what often guides in my decision-making process if I should remove certain element or not, is this sentence: if it doesn’t add to the message, but catches the eye, it is a distraction. Let me explain.
Stray hairs are often what I consider a distraction. However, there are images, that stray hair can be considered a feature. Something that does add to the message or the story. For example, if the image shows a person standing in a windy environment and that windy environment is part of the story. The stray hairs and their movement can strengthen the perception of wind and guide the viewer to the desired message.
Another, often debated, ‘distraction’ are moles or pimples on skin. I have clients who (almost) always want to clean the skin as much as possible. I have also clients who prefer to keep every pimple, mole or scar on the skin. It is a personal (meaning, subjective) decision. It can also depend on the final usage of the image. Often advertising images are the ones that require to remove every smallest ‘distraction’ from skin. In portraiture, however, we often keep everything intact, because someone’s features (and imperfections) define (or describe) the person in front of the camera. If I remove all skin features, I change the look of that person and therefore change the person himself / herself.
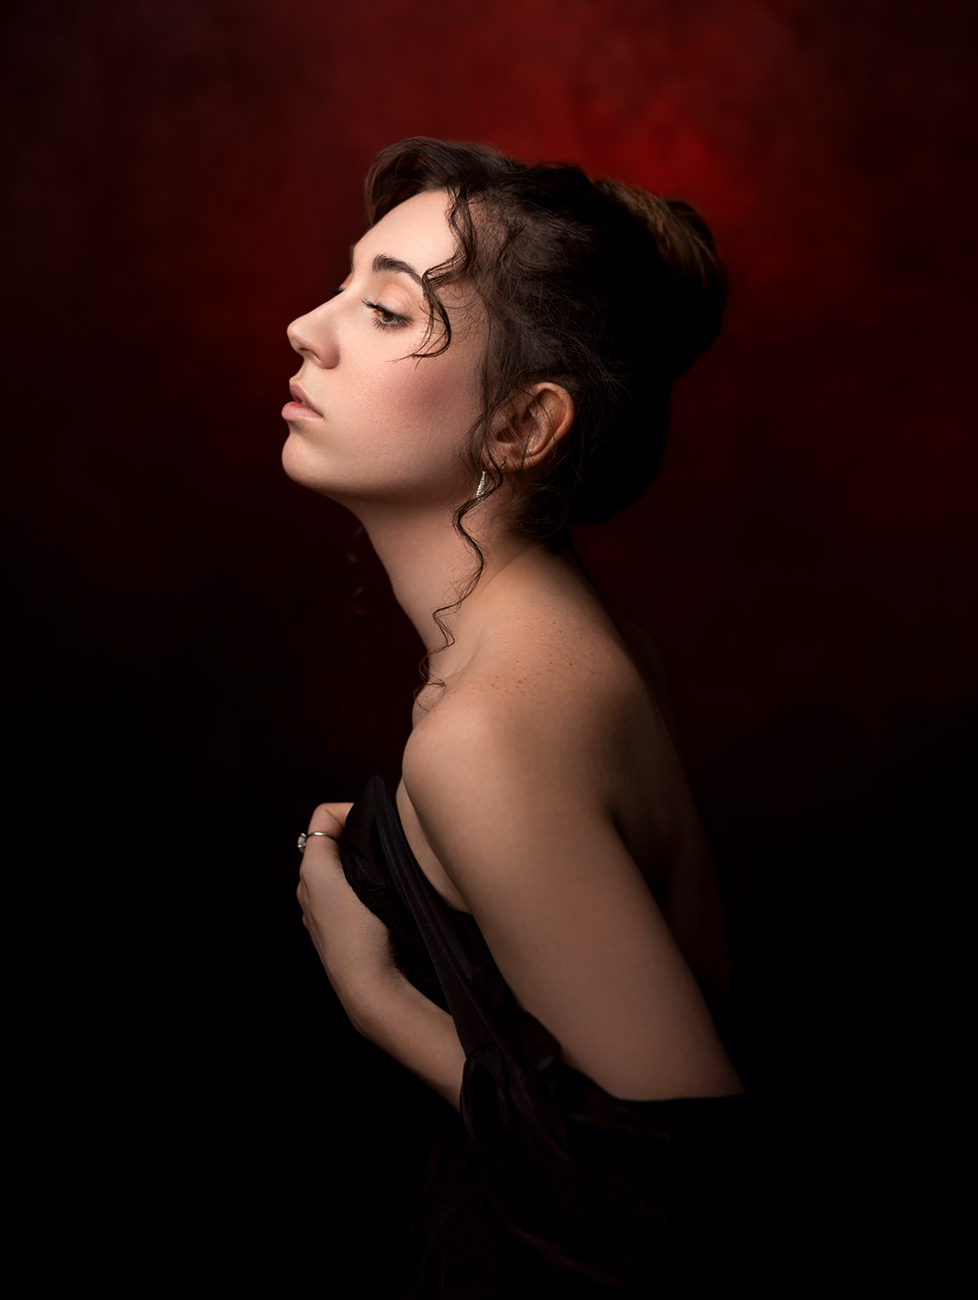
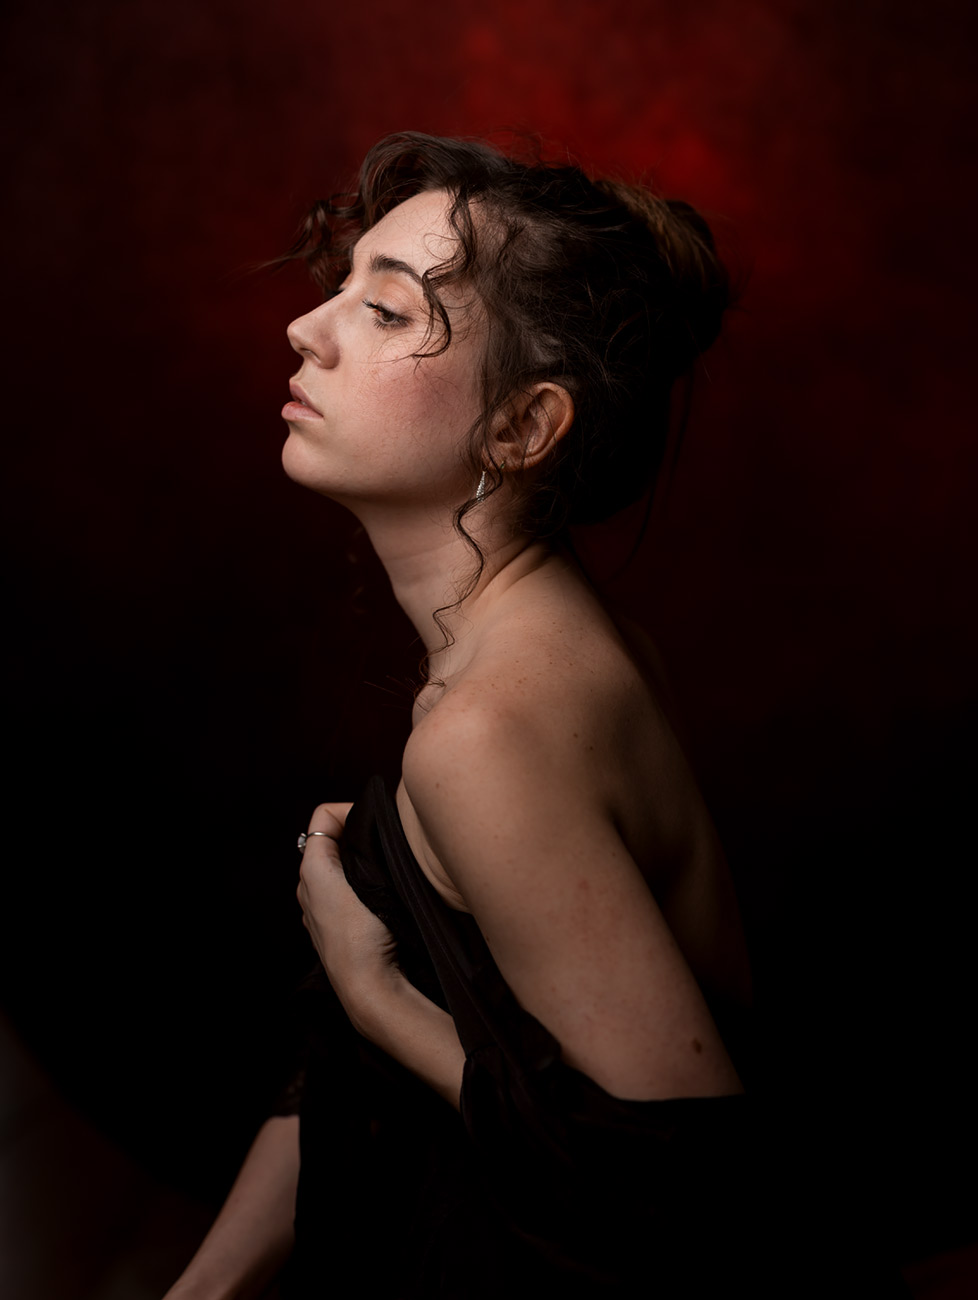
Please have a look at the image above. I have removed many elements to simplify the image and strengthen the message. Elements I considered distractions. For example, I have removed one of model’s arms. A bold move you might be thinking. I based the decision whether to remove it or not, on the sentence mentioned above. Does the arm add to the message? In my opinion, it doesn’t. Does it catch the eye? In my opinion it does. Therefore, in my opinion, it had to go. You can check bellow in the before / after images to see if that was the right decision.
Simplify images
You might be asking yourself, why remove so many elements from images at all. Why do you have to spend so much time removing so many elements. The idea here is to simplify the image as much as possible, so that the message (or its story) is clear to viewer.
For example, if I have an image of a man standing on a bus stop waiting for a bus. Do I need an overflowing bin full of rubbish next to him in the image? Would that bin add to the message or distract from it? If the image would be used to illustrate an article about buses being delayed and waiting times getting longer, it would not add to the message at all and it might even distract from it. However, if the same image would be used to illustrate an article about rubbish not being removed on time, then indeed the bin is an integral part of the message.
As you can see, it is not always easy to determine if something is an unwanted element or wanted element. If you are retouching the image for someone else, it’s best to ask if such a thing is wanted or unwanted. The image’s story plays a big part in the interpretation if such and such element should stay or go. If you are retouching your own image, think about what do you want to communicate through the image. It should help you decide what’s important and what is not.
In the image you can see above (and bellow) for example, I had to ask myself, are the pimples on her shoulder a distraction or not. I have decided to keep them, as I decided they are not a distraction, but can add a dose of realism to the image, make the skin look more real. Also, I have removed a big chunk of hair. I have decided it was catching my eye too much and not really adding anything to the image.
How to find distractions
You might be asking yourself how to check for distractions on an image. What do I do to see them clearly? In my case it is quite a simple process. I simply zoom out to see the whole image and look around it. When something catches my eye, meaning that my eyes stop on it, I decide if this is an unwanted distraction or simply an element of the message. If unwanted then remove, if wanted then keep.
When I come across something, like a stray hair for example, when working zoomed in and I have not noticed it before when looking at the whole image, I zoom out and check if it catches my eye. If it does and it does not add to the message, I remove it.
The idea is to remove as many distractions as possible. The simpler the image, the easier it is for the viewer to understand its meaning and therefore make a decision if the image works for them or not.
Even if, after these steps, I cannot decide if certain element should go or not, I often remove it on a new layer and zoom out again to see if I miss it, to see if removing it reduced the strength of the message. I toggle the layer or and off a few times and make my decision then. The same was done here, in this image, with the arm for example. I have removed it, zoomed out to see the whole image and decided it looks better without it.
Remove or…
Sometimes removing a distraction is not necessary though. Sometimes, simply darkening or lightening or blurring the unwanted element can reduce its impact enough, to decide that it does not have to be removed entirely. Again, the decision is yours. Before removing something, experiment. See if you can get away without removing it.
A distraction can also be something that is not an ‘element’ of the image per se. It can be patchy skin, discolouration of skin or other element, variation in colour or brightness. An element can be too bright or too dark, or too sharp. That’s why it is so important to zoom out and check each image carefully and either mark these distractions on a separate layer, or simply make a mental note of all of them.
The how
When it comes to how I remove unwanted elements, I don’t have much more to say other what you can find in many tutorials around the net. I find that there are plenty of ‘how’ tutorials around, but not many of ‘why’. That’s why my articles are designed more towards that route.
When it comes to the tools I use, I use a standard set of Photoshop tools: clone stamp tool and healing brush tool are my go-to set of tools. Sometimes I also use spot healing brush tool and content aware fill. With these four tools, I can remove pretty much everything I come across.
I hope this post helps you a little on your route to become better at photo retouching. I find that simplify images is an important tool to have in your photo retoucher toolbox. Beginners often tend to concentrate on smoothing skin or brightening eyes, but they miss this very important step in the process of working on an image.
Please feel free to suggest a subject you would like me to cover in my next article using comment section bellow. Until next time 😊
Before / after
Thank you
I would like to thank you, Dear Reader, for following the series and would like to apologise for crude and raw style of my writing. I hope it is easy to follow and understand, but if you would like me to explain something in more detail, please drop me a comment bellow.
If you want to read other parts of this free photo retouching workflow guide, please see the links bellow:
Part 1 – My Skin Retouching Workflow Explained
Part 2 – My Skin Retouching Workflow Explained some more
Part 3 – My Skin Retouching Workflow – Working With RAW
Part 4 – My Skin Retouching Workflow – Luminosity and Exposure
Part 5 – My Skin Retouching Workflow – Curves Tool – Why is it important?
Part 6 – My Skin Retouching Workflow – Introduction to Colour
Part 7 – My Skin Retouching Workflow – How to fix fingernails in Photoshop
Part 8 – My Skin Retouching Workflow – Simplify the image – remove distractions
If you would like to buy me a coffee, please use the link bellow. Thank you!
About the author

Adrian Alexander is a senior retoucher and founder of Ad Retouch Studio – digital photo retouching and post production studio. His first contact with Photoshop was in the 90s, but he found his true love of editing photographs during his photography years, which started when he purchased his first dSLR camera in January 2009. These days he is concentrated on his retouching business, finds pleasure in teaching, but his true love is still improving photos in Photoshop.