I wanted to create a separate article about creating with curves adjustment layer, because they are so powerful that they deserve a little bit more of attention. Plus, it is my favourite adjustment layer and go-to for many problem solutions. If you want to find out why I have dedicated a whole blog post and a few hours of my life to write about one specific adjustment layer, then please read on. Everything will be explained bellow.
Curves – why?
I use curves adjustment layer to solve problems like:
– dodge and burn main layers,
– exposure modifications and corrections,
– colour corrections,
– colour changes,
– colour grading.
As you can see above in pretty much every step of my skin retouching workflow, curves layer is one of my main tools.
Understanding and mastering curves and other adjustment layers is the difference between an OK Photoshop user and Photoshop expert, in my opinion. In fact, it is so important, that I have decided to dedicate a whole blog post to one specific adjustment layer.
Curves – my way
Curves layer can control both, colour and luminosity values. You can make those modifications using a single adjustment layer if you want, but that is not something I recommend to be honest. I will talk a little bit more about how I work with Curves bellow, but my general rule is I try to create many separate layers and each to be making a small change, instead of cramming all changes into one layer. As mentioned in previous parts of these articles, I also like to separate luminosity and colour work and don’t really mix them.
Curves – what is it?
Let’s jump into a little bit more detail about curves adjustment layer and let’s start with definition what curves really are.
Here is a paragraph from the Photoshop bible written by Martin Evening:
“Curves adjustment layer
Any image adjustment that can be done using Levels can also be done using Curves, except with curves you can accurately control the tonal balance and contrast of the master composite image as well as the individual colour channels. You can also target specific points on the curve and remap the pixel values to make them lighter or darker and adjust the contrast in that tonal area only.” *
Curves are so powerful, that you can replace many other adjustment layers with just a bunch of curves layers in your layer panel. That does not mean that I do not use any other adjustment layers. I do, but curves is still the tool I use the most.
Curves – 2 ways?
There are two ways of working with Curves, but I use one of them in 90% of situations. I will quickly mention what are the two ways and what is the difference between them.
The first method is when you fire up Curves as direct dialogue box. That is, not as an adjustment layer. You can do that by going Image > Adjustments > Curves. It will open up a dialogue box and you will notice that there is not a new layer created in your layer panel. This way you will be making changes directly to the selected layer. I don’t use this method this way at all, because this is a destructive method. Meaning that the changes you make, once you close Photoshop down and then come back to the file later, you won’t be able to undo them. The only way I use this Curves dialogue box is when I make changes to colour channels in the Channels palette.

The way I use Curves the most is as an adjustment layer. If you go to your layer panel, at the bottom is something that looks like a half white, half translucent circle (with a little triangle underneath and to the side). If you click that a new dialogue menu will open with all the adjustment layers you can create / add to you panel. Select Curves… and voilá, you got yourself a Curves adjustment layer. This is where the fun begins.
There are so many different things in which you can work with Curves, that I won’t be able to explain them all here. I will talk about the way I work with Curves the most.
Curves – tools

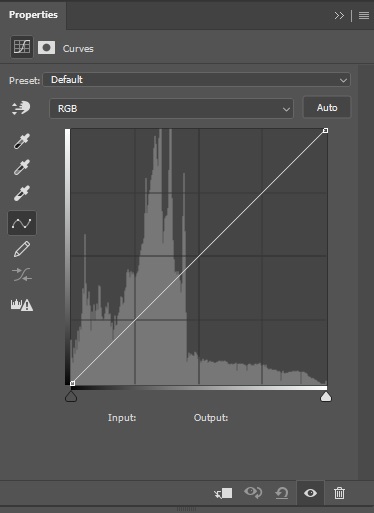
When you open Curves dialogue box, you will notice a square box with your histogram inside and a line going through between lower left corner to top right corner. If you remember how to work with histogram, this will come in handy here. Histogram goes from left side, which represents dark part of the image to the right which represents bright parts of the image. The middle portion represents mid-tones. Keeping that in mind, we can see that if we add points to the line going in front of the histogram in the Curves adjustment dialogue box (you add points by clicking on the line) and then move the points up or down, we can see that the straight line changes into a curved one (hence the name).
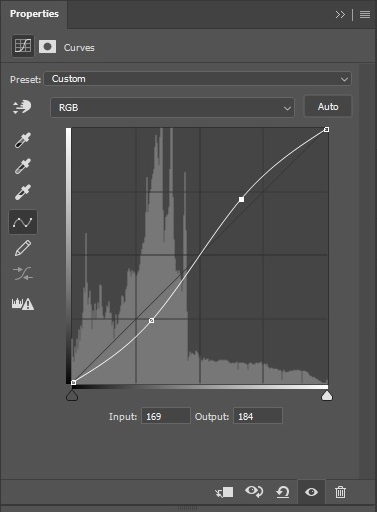
There are also two sliders bellow the square representing your histogram, one dark, one light. They are called shadow and highlight Input Level sliders. This is the exact same sliders as you can find in Levels dialogue box (apart from not having slider for mid-tones, but you can still control mid-tones within Curves by creating points on the line and adjusting these). Instead of moving the sliders though, you can click on the two points representing the sliders on the adjustment line and move them up or right (in case of shadows), down or left in case of highlights. This gives you a great control over your shadow and highlight points.
What’s more, you can add additional points to the line and fine tune your shadows, mid-tones and highlights even further. By adding many points to the line, I can use some of them to stabilise line and only make a change to specific range within the histogram. It is an extremely powerful tool.
Curves – my way
This is the way I use the Curves the most, by adjusting the line and having a fine control over all of the parts of the image.
I also use the Preset drop down menu, but I only really use one preset from there. And that is Linear Contrast (RGB). I use it to quickly add contrast to the image. The effect is still a bit strong for many instances, so I either modify the curve myself and reduce the layer’s opacity. You can actually do the same by opening Curves and adding a couple of points on the line, one near left side (shadows), one near right side (highlights). I find that using the drop-down menu and selecting the preset a tiny bit faster than selecting points on the line and modifying them, but either way is good.
Curves – corrections

You can often notice that if you start playing with contrast, the colours will also change. Often the darker you go the more saturated the colours will get. This is normal, but not always wanted. If you want to limit the changes your Curves layer will have on colour, you can change its blending mode to Luminosity. And, also, the opposite is true, if you want your Curve layer to be controlling colour mostly and not making changes to luminosity values, select Colour blending mode.
There are many other modifications you can make with a Curves layer, like using the eyedropper tools to select and control your black and white point, as well as the mid-tone point and hence modify white balance. You can draw the line using the pencil tool. You can manually type in your Input and Output numbers. You can select a specific part of the image and make the curves control that part by selecting the hand tool and clicking on your image. You can control Curves tool in many ways, which is partly the reason why it is so powerful and popular.
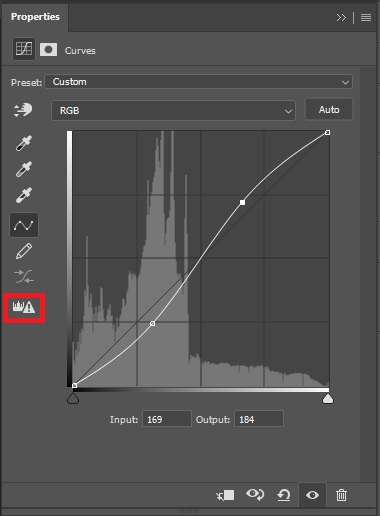
I will mention one additional thing here, and that is the Calculate more accurate histogram button. I use it from time to time when I want to see more accurate histogram underneath my curves. Each change you make to the curves, modifies the histogram as well. Photoshop does quick calculations and shows you a quick histogram preview. To see more accurate histogram, hit that button to tell Photoshop to spend more time calculating a more accurate visual representation of your histogram. This is useful if you want to make fine changes to the image. Seeing accurate histogram might help you achieve that.
Curves – colour
I use Curves in another way too, to control colour and specific colour channels. I use this mostly for colour correction, but sometimes even for colour grading.
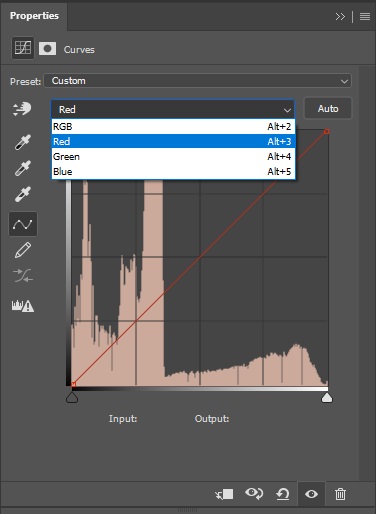
If you click on the RGB drop down menu, you can see that you can select Red, Green and Blue channels directly in you Curves dialog box. You will notice that the colour of the line will change to represent each channel you select. Now you can make changes, the same way as described above, by creating and modifying points on the line, to each individual colour channel.
That is one of the main advantages of using Curves, you can make changes to so many different things just by using a single layer panel. Not that I recommend doing all changes on one adjustment layer though, I usually prefer having a few Curves adjustment layer each controlling one thing only.
Curves – luminosity
For example, let’s say I want to add contrast to the image and also bump up the mid-tones a touch. I will create a Curves adjustment layer, create two points on the line to push shadows down and highlights up (so adding contrast). Change blending mode to Luminosity if I don’t want the layer to be changing my colour values too much. Then I will create another Curves adjustment layer, add a point in the middle and move it up to boost my mid-tones a bit. I could do both of these things on one layer, but I find it easier to do them on separate layers. This is so that I can easily remember (and check later if I forget), what change each layer does and also so that I can reduce or remove each change easily if I so desire in future.
Curves – the mask
The true power of using Curves as adjustment layer comes from the mask. This makes all the difference. Instead of making changes globally, to the whole image, I can make changes locally, using mask, to change only the part of the image I want.

The best example of this is the DB technique, where I create two curves layers, one to darken, one to lighten, invert their masks and then add minute brush strokes to the mask to reveal the Curves layer modification to specific points or patches of the image.

Same thing can be done on a bigger scale. Let’s say I want to darken a bottom left corner of the image. I create a Curve adjustment layer, modify its line and points to make the image darker as much as I want (I have a full control of what I want to change and how), then invert its mask and then using white brush, to reveal the darkened values in place I want to using softer or harder brush. The control is almost limitless.
What’s more, this approach is 100% non-destructive, meaning that if I decide later on that the adjustment I have made this way is not needed any more, or that I don’t like its effect, I can then go to that adjustment layer, switch it off completely, or modify the curves or lower the opacity to limit its effect.
Curves – control
This is the true power of Photoshop and reason why I like working with this program so much. It gives me total control over what I want to do, how I want to do it and also allows me to control which part of the image I want to change, by how much and even allows me to make changes to those changes in future, either in an hour, next day or even years down the line.
Curves and other adjustment layers are well worth investing time to master. Learning how to work with adjustment layers in general and Curves layers in particular has made a huge difference to my retouching workflow and also my skill-set as a retoucher. I cannot imagine not being able to use adjustment layers in my retouching workflow. Being a high end retoucher, I rely on the control and flexibility Curves and other adjustment layers offer. I suggest that if you want to become a professional photo retoucher, you invest time into learning Curves and other adjustment layers. It will transform the way you think about making changes to photos you work on in future and give you the flexibility your clients will appreciate.
And that’s it…
This article is only an introduction into the world of Curves and other adjustment layers. It’s not easy to describe in words something that I do instinctively, but I hope this was useful to you and it will help you understand and appreciate flexibility and power Curves tool can offer.
If you want to learn more about my skin retouching workflow, you can find links to four articles about this subject I wrote bellow:
Part 1 – my skin retouching workflow explained
Part 2 – my skin retouching workflow explained some more
Part 3 – my skin retouching workflow – working with RAW files
Part 4 – My skin retouching workflow – luminosity + exposure
Part 5 – My Skin Retouching Workflow – Curves Tool – Why is it important?
Part 6 – My Skin Retouch Workflow – Introduction to colour
Part 7 – My Skin Retouching Workflow – How to fix fingernails in Photoshop
Part 8 – My Skin Retouching Workflow – Simplify the image – remove distractions
References:
* – “Adobe Photoshop CS5 for Photographers” – Martin Evening
If you would like to buy me a coffee, please use the link bellow. Thank you!
About the author

Adrian Alexander is a senior retoucher and founder of Ad Retouch Studio, photo retouching and post production studio based in UK. His first contact with Photoshop was in the 90s, but he found his true love of editing photographs during his photography years, which started when he purchased his first dSLR camera in January 2009. These days he is concentrated on his retouching business, finds pleasure in teaching, but his true love is still improving photos in Photoshop.
